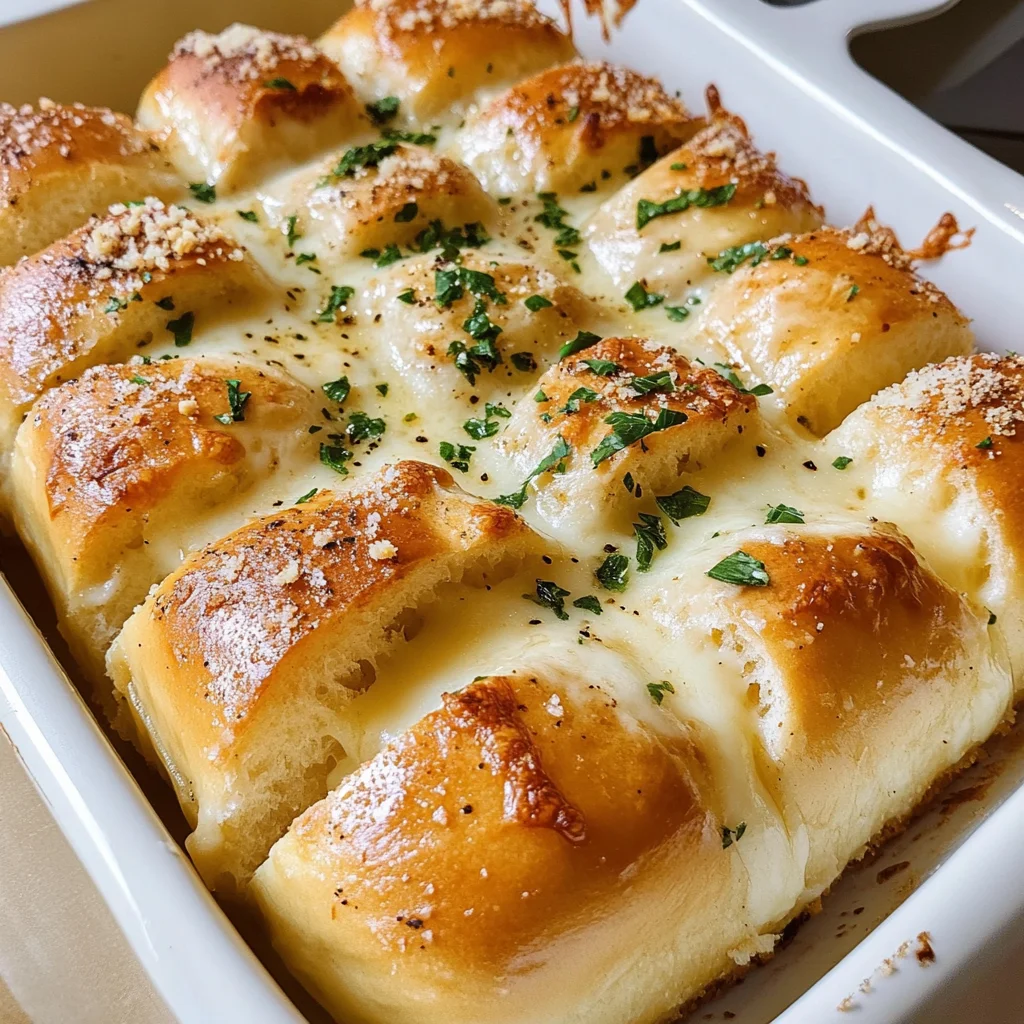
Cheesy Hawaiian Roll Garlic Bread (Viral TikTok Recipe)
If you’re looking for a delightful treat that brings joy to any gathering, you’ve found it! Cheesy Hawaiian Roll Garlic Bread (Viral TikTok Recipe) is an absolute crowd-pleaser. Imagine slightly sweet Hawaiian rolls that are perfectly slathered in garlicky butter and oozing with melted cheese. This recipe is so easy and quick to whip up, making it perfect for busy weeknights or family gatherings where smiles and good food are a must!
I love how this cheesy bread can elevate any meal or stand alone as a snack. Whether you’re hosting game night or simply enjoying a cozy dinner at home, this recipe is sure to become a favorite in your household!
Why You’ll Love This Recipe
- Quick and Easy: Just 20 minutes from start to finish! Perfect for those busy days when you need something delicious fast.
- Family-Friendly: With its irresistible cheesy goodness and sweet rolls, everyone will want seconds—kids and adults alike!
- Make-Ahead Friendly: You can prep the rolls ahead of time and bake them just before serving, giving you more time to enjoy with your guests.
- Versatile Snack: Great as an appetizer, side dish, or even a delicious midnight snack. You can serve it with pasta, salads, or on its own!
- Viral Sensation: Join the trend with this popular TikTok recipe that’s taken the internet by storm—your friends will be impressed!
Ingredients You’ll Need
This recipe calls for simple, wholesome ingredients that come together beautifully. You probably have most of these items in your kitchen already! Here’s what you’ll need:
For the Rolls
- 12-16 count Hawaiian rolls (2 slits cut into the top of each, halfway through)
For the Garlic Butter Mixture
- 1 stick salted butter (softened)
- 1 tbsp chopped fresh parsley (washed thoroughly)
- 2 1/2 tbsp minced garlic
- 1 tbsp grated Parmesan cheese
For the Cheese Filling
- 1 1/2 cups shredded mozzarella cheese
Variations
This recipe is wonderfully flexible! Feel free to get creative with it and make it your own.
- Add Some Spice: Mix in red pepper flakes for a little kick if you like things spicy!
- Herb It Up: Swap out parsley for basil or oregano for an extra layer of flavor.
- Cheese Lovers Delight: Use a mix of cheeses like cheddar or gouda along with mozzarella for a cheesier experience.
- Veggie Boost: Add some sautéed spinach or roasted red peppers inside the rolls for extra nutrition and flavor.
How to Make Cheesy Hawaiian Roll Garlic Bread (Viral TikTok Recipe)
Step 1: Prepare Your Rolls
Start by placing your prepared Hawaiian rolls into a buttered 9×13 baking dish. The butter will help them crisp up nicely while baking, creating that golden brown crust we all love.
Step 2: Stuff Them With Cheese
Next, gently stuff the slits in each roll with shredded mozzarella cheese. This step is crucial because as they bake, the cheese will melt and create gooey pockets of deliciousness that will make every bite heavenly.
Step 3: Make Your Garlic Butter Mixture
In a small bowl, combine softened butter with parsley and minced garlic. Whisk until evenly combined. Spread this flavorful mixture generously over the cheese-stuffed rolls. This step ensures every bite has that rich garlic flavor we crave!
Step 4: Bake Until Golden Brown
Bake your rolls at 400° for about 9-11 minutes. Keep an eye on them until the cheese is melted and the tops are golden brown. The aroma wafting through your kitchen will be absolutely irresistible!
Step 5: Serve & Enjoy!
Once they’re out of the oven, serve these beauties warm! They’re best enjoyed fresh but trust me; they won’t last long on the table!
Pro Tips for Making Cheesy Hawaiian Roll Garlic Bread (Viral TikTok Recipe)
Making the perfect cheesy Hawaiian roll garlic bread is all about those little details that elevate your dish to the next level. Here are some pro tips to ensure your creation is a crowd-pleaser!
- Use fresh ingredients: Fresh garlic and parsley will boost the flavor significantly compared to dried alternatives. The vibrant taste of fresh herbs makes a noticeable difference in this recipe.
- Don’t skimp on butter: Generously spreading the garlic herb butter over the rolls ensures that every bite is rich and flavorful. It not only adds moisture but also helps create that beautiful golden crust.
- Customize your cheese: Feel free to mix and match cheeses! Adding different varieties like cheddar or gouda can bring new flavors and textures to your garlic bread, making it even more irresistible.
- Serve immediately: This dish is best enjoyed fresh out of the oven while the cheese is gooey and melty. The warmth of the rolls combined with the melted cheese creates a delightful experience.
- Experiment with spices: Try adding a pinch of red pepper flakes or Italian seasoning to your butter mixture for an extra kick. These spices can enhance the overall flavor profile, making each bite more exciting.
How to Serve Cheesy Hawaiian Roll Garlic Bread (Viral TikTok Recipe)
Presenting your cheesy Hawaiian roll garlic bread beautifully can turn an ordinary meal into something special! Here are some delightful serving suggestions.
Garnishes
- Chopped green onions: A sprinkle of chopped green onions adds a pop of color and a mild onion flavor that complements the richness of the cheese.
- Fresh parsley: A few fresh parsley leaves scattered on top not only enhance visual appeal but also provide a burst of freshness that balances the savory elements.
Side Dishes
- Simple Salad: A light salad with mixed greens, cherry tomatoes, and a vinaigrette dressing will offer a refreshing contrast to the rich garlic bread.
- Roasted Vegetables: Roasted zucchini, bell peppers, or asparagus seasoned with olive oil and herbs can add healthy variety and color to your meal.
- Creamy Tomato Soup: This classic pairing enhances the comfort factor. The warmth of tomato soup perfectly complements the cheesy goodness of your garlic bread.
- Grilled Chicken Skewers: Marinated grilled chicken skewers are easy to prepare and provide a lean protein option that pairs well with the flavors in your garlic bread.
With these presentation ideas, you’ll have an impressive dish ready for any occasion! Enjoy sharing this delightful recipe with friends and family.
Make Ahead and Storage
This Cheesy Hawaiian Roll Garlic Bread is perfect for meal prep, allowing you to enjoy its deliciousness without the last-minute rush. You can easily store leftovers or prepare it in advance for a gathering.
Storing Leftovers
- Allow the garlic bread to cool completely.
- Place leftovers in an airtight container.
- Store in the refrigerator for up to 3 days.
Freezing
- Wrap the cooled garlic bread tightly in plastic wrap.
- Then, place it in a freezer-safe bag or container.
- Freeze for up to 2 months for best quality.
Reheating
- Preheat your oven to 350°F (175°C).
- Remove the wrapping from the frozen garlic bread and place it on a baking sheet.
- Bake for about 15-20 minutes or until heated through, and enjoy!
FAQs
Got questions? No worries! Here are some answers that might help you out.
Can I make Cheesy Hawaiian Roll Garlic Bread ahead of time?
Yes! You can prepare the garlic butter and stuff the rolls a few hours in advance. Just cover them tightly and bake when you’re ready to serve!
What type of cheese works best in Cheesy Hawaiian Roll Garlic Bread?
While mozzarella is traditional, feel free to experiment with other cheeses like cheddar or provolone for added flavor.
How do I keep my Cheesy Hawaiian Roll Garlic Bread fresh?
Store any leftovers in an airtight container in the fridge. It should stay fresh for about three days!
Can I add toppings to my Cheesy Hawaiian Roll Garlic Bread?
Absolutely! Some fresh herbs, chili flakes, or even a sprinkle of Italian seasoning can elevate this dish even further.
What dishes pair well with Cheesy Hawaiian Roll Garlic Bread?
This cheesy delight complements soups, salads, or pasta dishes perfectly! It’s also great as a snack on its own.
Final Thoughts
I hope you enjoy making this delectable Cheesy Hawaiian Roll Garlic Bread as much as I do! It’s a comforting treat that’s sure to bring smiles at any gathering. Let me know how it turns out and feel free to share your creative twists on this recipe. Happy baking!
Cheesy Hawaiian Roll Garlic Bread

Indulge in the ultimate comfort food with Cheesy Hawaiian Roll Garlic Bread, a viral sensation that’s perfect for any gathering. This delightful dish combines the sweetness of Hawaiian rolls with a rich garlic butter mixture and gooey mozzarella cheese. In just 20 minutes, you can whip up this crowd-pleaser that works beautifully as an appetizer, side dish, or snack. Whether you’re hosting friends or enjoying a cozy night in, this recipe is sure to impress with its buttery flavor and cheesy goodness. It’s easy to customize, so feel free to add spices or different cheeses to make it your own!
- Prep Time: 10 minutes
- Cook Time: 10 minutes
- Total Time: 20 minutes
- Yield: Approximately 16 servings 1x
- Category: Appetizer
- Method: Baking
- Cuisine: American
Ingredients
- 12–16 Hawaiian rolls (with slits cut into the top)
- 1 stick salted butter (softened)
- 1 tbsp chopped fresh parsley
- 2 1/2 tbsp minced garlic
- 1 tbsp grated Parmesan cheese
- 1 1/2 cups shredded mozzarella cheese
Instructions
- Preheat your oven to 400°F (200°C) and prepare a buttered 9×13" baking dish.
- Stuff the slits in each Hawaiian roll with shredded mozzarella cheese.
- In a bowl, mix softened butter, parsley, and minced garlic until well combined. Spread over the cheese-stuffed rolls.
- Bake for 9-11 minutes until golden brown and the cheese is melted.
- Serve warm and enjoy!
Nutrition
- Serving Size: 1 roll (45g)
- Calories: 150
- Sugar: 3g
- Sodium: 250mg
- Fat: 10g
- Saturated Fat: 6g
- Unsaturated Fat: 4g
- Trans Fat: 0g
- Carbohydrates: 15g
- Fiber: <1g
- Protein: 3g
- Cholesterol: 30mg